.webp)
.webp)
.webp)
.jpg)

.svg)
.svg)

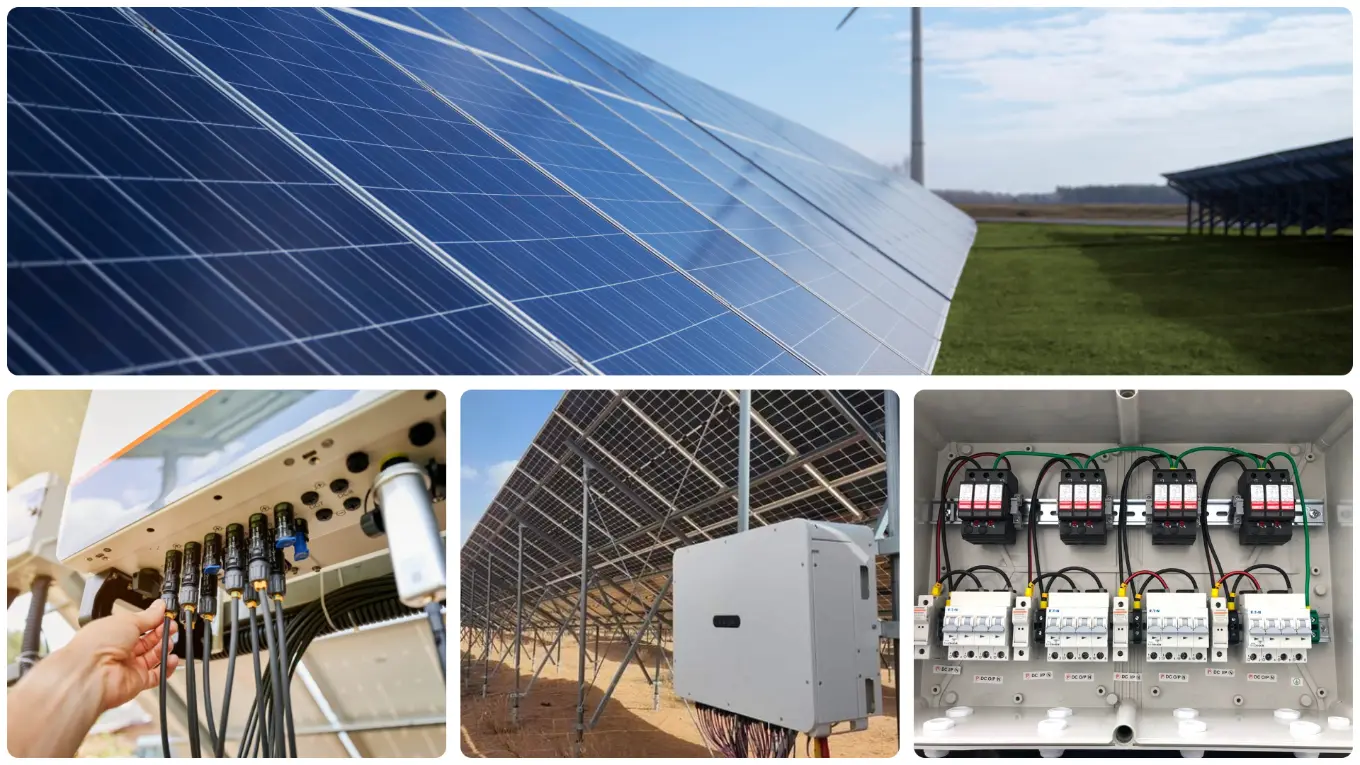
An efficient solar installation is what makes an EPC standout in the crowd of thousands of EPC & installers use anyone in the country. Beyond the quality of design and materials, superior workmanship is what ensures the longevity of a solar plant. A hallmark of outstanding workmanship and installation is a minimal number of customer complaints, faults, and repairs. A meticulous and secure installation not only guarantees a reliable solar plant but also leaves a lasting impression on clients and visitors alike, significantly enhancing organic referral marketing.
Apart from the key technical responsibilities of the installation, you as solar EPC company also needs to:
- Ensure number of solar panels and other equipment are as per the design.
- Ensure proper handling of panels and other materials.
- Assess precautionary measures to be taken.
- Ensure effective functioning of the system post-installation.
- Manage wastes and workplace safety.
- Deliver quality work as per standards despite constraints.
- Ensure customer satisfaction and get feedback on standards of workmanship.
- Ensure the plant is easily accessible to maintain & as well O&M
So, let’s get into the blog and let us try and understand the nitty-gritty associated with installing a solar rooftop plant.
Pre-Installation Site Visit: A site visit is one of the most valuable activities an installer can undertake. Despite the fact that you did a site visit prior to the closing of deal, it is recommended to conduct this visit with the supervisor and one or two key team members along with the design and drawings. This allows the team to gain a clear overview of the work, timeline, and preparations needed. During this visit, the team can also identify any potential issues that can be addressed early or plan necessary logistics in advance. Additionally, this helps with organizing the unloading and transportation of materials to the roof.
Safety and Permits: Residential RCC roofs are easier to work upon considering the safety aspects as most residential roofs are surrounded by parapet with almost 1m of height. Having said that safety should have utmost importance in all cases, as working on roofs can be life threatening. Here are some basic PPE gears which your team should be equipped with while installing solar.
- Safety Shoes
- PPE kit
- Safety Helmet
- Safety goggles
Tools: Every installation will require a certain set of tools, make survey our team carries the tools to the site to ensure timely installation. Some of the important tools include:
- Angle finder
- Level
- Nut/Screw driver
- Drilling machine
- Drill bits
- Wire strippers
- Hacksaw
- Tape measure
- Extension cords
- Crimpers
- Needle-nose pliers
- Lineman's pliers
- Slip-joint pliers
- Wire cutter
- Clamp meter
- C-clamps
- Multimeter
- Voltmeter
Permits If the installation is happening on a commercial or an Industrial roof, make sure you have the necessary permits and understand the procedure for permits well in advance.
Weather The installation team has to be in their best health to install the rooftop plant but apart from that too windy, rainy or too sunny condition shave to be definitely avoided. This ensures safety of the team and also make sit an error free installation. In summers, when the temperatures soar high, the team can start early and take a break during the peak sunny hours to get some respite and resume work later in the day.
Marking: Marking is crucial not just for placement but also for alignment. Marking with accuracy is necessary for solar panel alignment, cable routing etc. It can be also tricky when it comes to sloped roofs as tin sheds will have crests and valleys and clamps have to be fitted as per the profile. Hence marking needs to be done with utmost attention.
Now that we have a decent understanding of the pre-requisite for installing a solar rooftop plant, let us understand step by step the activities to be carried out.
Steps for installation
1. Installation of PV Mounting Structure
Fix the Rails or Structure
- Use the marking and align the structure.
- Securely fasten the rails to the roof structure using bolts, screws, or clamps.
- Double-check the alignment to ensure the panels will sit evenly.
- Connect the structure to the earthing system.
2. Installation of Solar Panels
Panels should be installed after the earthing system of structure is completely constructed. It is important for the team to be well-informed about the proper handling, packaging, and storage of solar panels to prevent damage during installation
Transport, Unloading and Storage of Solar Panels
- To avoid breakage and micro-cracks during loading, transportation and unloading of panels, the panels must be packaged properly even if the distance of travel is short. Rough handling during loading and unloading and walking on the package must be avoided.
- Solar Panels should be unpacked in the vertical manner. Care should be taken to avoid falling over of one panel onto the other inside the packaging box.
- When unboxing, solar panels should be stacked, packed and stored vertically and separators should be placed between each panel. Horizontal stacking and storing should be avoided.
- If due to unavoidable reasons, the panels are needed to be stacked and stored horizontally, a good buffer material (cardboard) should be introduced between each panel and around the panels.
Module Installation
- Refer to the drawing and attach Panels to Rails/Structure.
- Mount the panels in either landscape & portrait orientation depending on the drawing.
- Solar panels can be fixed either by bolt method or by the clamp method;
- Maintain proper spacing between panels for thermal expansion and airflow.
- Understand and follow manufacturer installation manual and recommendations. Use predrilled mounting holes. Additional holes drilled in the frame may avoid the warranty.
- Use of insulated tools and gloves while working with panels.
- Do not step on the solar panel as this will damage to the solar cells inside the panel & create microcracks which might be not visible
- Ensure electrical connectors are well protected from ingression of water and dust.
- The installation of panels should be done in dry weather condition using dry tools to avoid risk of electric shock.
- No heavy or sharp edge items should be placed on them to avoid damage to the glass cover.
Important to Note: Do NOT connect the panels in the strings while fixing the panels in the structure. This will produce high DC voltage, which is extremely dangerous for the installation team. Connection should be done at a later stage.
3. Earthing of PV module frames
- After physical installation, solar panel frames are to be bonded together and connected to main earthing conductor of the mounting structure.
- Conductors shall run as close to the positive and negative solar array conductors as possible to reduce induced voltages due to lightning.
- The earthing conductor must be properly fastened to the solar panel frame to ensure good electrical contact.
- Solar panel frames have anodized coating which is an aluminum oxide, and it works as insulation. Therefore, appropriate methods should be used to scratch the aluminum oxide coating and establish an electrical bond between the solar panel frames and the mounting structure.
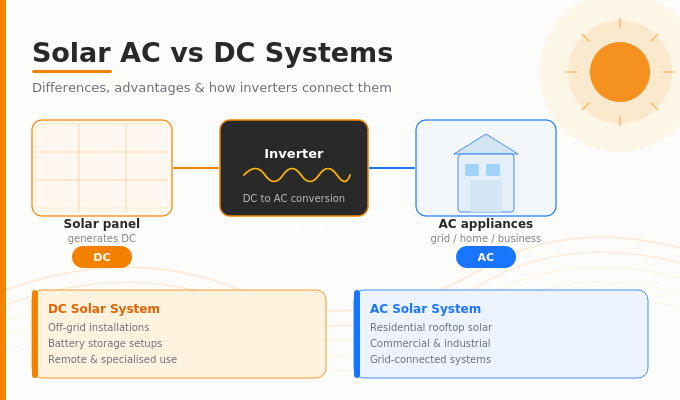
4. DC cabling
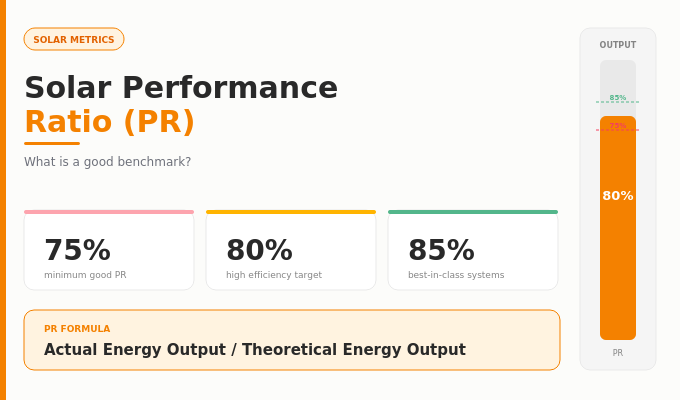
It is important to minimize voltage drop loss in the cables for a desired performance of solar PV systems. Ensure that aggregate voltage drop in all DC cables is less than 2%.
Stringing of solar panels
Solar Panels are to be connected in series electrically to form a string. The number of panels in a string will depend on the design/drawing.
- Use stainless steel clamp or UV protected cable tie to fix cables.
- Connect the panels as per the design.
- Final connection will be done when the system is ready for commissioning.
- Ensure that connectors are corrosion free, cleaned with absolutely no gaps between the contacts.
- While connecting the panels, one MC4 connector in each string should remain disconnected until all wiring to the DC combiner box or inverter is complete. This ensures that no one is exposed to live, potentially hazardous DC voltage during installation.
- Once the strings are made, Install DC combiner box if mentioned in the design.
Note:
- the cables with cable tie wraps to the module frame and/or rails.
- Ensure minimum looping in cable.
- Ensure NO cable is hanging loose.
- Label the terminals with “+” and “-” sign using cable tag.
- Always verify the voltage and polarity of each individual string before making parallel connection. Electrical and electronic components can be irreparably damaged if an array string is connected in reverse polarity to another.
5. Installation of DC Cable from solar panels to DCDB and DCDB to Inverter
DC cables should be laid within the conduits or cable tray with lid. Installation of DC cables shall be undertaken with care such that the possibility of line-to-line and line-to- earth faults occurring is minimized. All connections shall be verified for tightness and polarity during installation to reduce the risk of faults and possible arcs during commissioning, operation, and future maintenance.
6. Inverter
- The inverters must be easily accessible with sufficient space around them, for maintenance and servicing asper operation manual
- The inverter mounted on the ground or a wall should be at a height convenient for reading its display.
- Ensure adequate open space is provided around ventilation panels for heat dissipation.
- Keep the DC and AC distribution boxes are located near the inverter.
- Ensure the array output wires from the combiner box are routed to the DC distribution box along the shortest route.
- Ensure that the wiring to the DC or AC isolator switch and surge protection devices is properly installed to prevent ground faults and short circuits.
- The ACDB may be combined with the load distribution box. If separate, it should be located near the load distribution box.
- ACDB enclosures should be connected to the ground.
When DC cables and inverters are installed; the next step is to install AC cables. Ensure that total voltage drop in all AC cables is less than 2%.
- Install the cable tray.
- Pull the conductors through cable tray.
- Leave excess conductor or cable near each equipment terminal.
- Read inverter installation and operation manual carefully.
- Ensure that there is adequate ventilation for the inverter.
- In general, Minimum 20cm clearance to be maintained to the top and bottom of the inverter. Minimum 10cm clearance to be maintained to the right and left of the inverter or as per ISI 255
- Keep adequate clearance to access the fans and air filters for regular cleaning. Keep adequate clearance for cable entry.
- Ensure that no direct sunlight falls on the inverter.
- Mount the inverter with accessories provided by the manufacturer.
- Ensure there is no grid supply to the inverter during installation
- Complete the installation from the inverter to the AC isolator and energy meter as per the given drawing.
- Install the earthing connection as per inverter installation manual.
- Tighten the cable glands using appropriate tools.
7. Lightning Protection System (LPS)
Lightning protection: Lightning can cause damage to a PV system either by a direct strike or through surge in the grid resulting from a nearby lightning strike. Lightning protection installations should follow IS:2309-1989 (Reaffirmed 2010). Install the lightning arrestor on the highest point in the building. Ensure The lightning arrestor should be connected to a separate earthing pit.
8. Placing of signage
It is important to have appropriate signages in the solar power plant to minimize any hazardous situations associated with the project site. Place the following signage in appropriate locations, as applicable. The signs should be readable from at least 1 m.
Signages for following should be included
- Solar DC side
- DC isolator switch
- AC side
- AC isolator switch
- Main switch
- Emergency information
- Shutdown procedure board
- Earthing pits
9. Plant Commissioning
Visual Inspection
- Verify that all bolts, screws, and clamps are tightly secured.
- Ensure cables are neatly routed and adequately protected from environmental exposure.
Commissioning
- Perform a system performance test to confirm energy generation meets the design specifications.
- Record and document all test results for future reference
Once you have verified that all conductors and connections are in good condition and the system has successfully passed pre-commissioning tests, it is time to proceed with system commissioning.
Procedure
- Refer to the inverter’s system manual and follow the start-up procedure
- Check the inverter display and confirm that the solar array is supplying power to the utility grid.
- Measure either the AC or DC current using a clamp meter and compare inverter output
- Measure the DC input voltage and confirm that it is with in the operating limits of the inverter
- Measure the AC output voltage out of the inverter.
Tests to be performed in sequence:
Test 1: Inverter must cease supplying power within two seconds of a loss of mains
STEP 1: Keep DC supply from the solar panels/array connected to the inverter
STEP 2: Place the voltage probe in the inverter side of the AC main switch(on the load side of the switch.)
STEP 3: Turn OFF the AC main switch through which inverter is connected to grid
STEP4: Measure the time taken for the inverter to cease attempting to export power with timing device and record.
Test 2:Inverter must not resume supplying power until mains have been present for more than 60 seconds.
STEP 1: Keep DC supply from the solar array connected to the inverter.
STEP 2:Place the current probe in the inverter side of the AC main switch (on the load side).
STEP 3: Turn ON the AC main switch through which inverter is connected to grid.
STEP 4: Measure the time taken for the inverter to re-energize and start exporting power with a timing device and record
Grid Synchronization: Test the inverter to ensure it synchronizes with the grid frequency and voltage.
Net Meter Install a bi-directional energy meter(net meter) to measure energy imported/exported to the grid as per the DISCOM authority’s instructions.
Induct procedure for plant onboarding & credit credential: Setup the remote monitoring system and setup a demonstration for the customer and share the credentials with them. Also, if you want to monitor all your sites in a single dashboard for O&M, checkout AeROC, a hardware agnostic software which has more than 15 inverter & datalogger brands integrated, with more brands being added regularly.
This blog may not cover every aspect of installing a solar rooftop plant, but we hope it provides you with a helpful overview as you plan your next installation. As mentioned earlier, a well-functioning solar plant involves more than just assembling high-quality components; it is the workmanship that truly ensures the solar plant lasts its lifetime with minimal repairs.


.png)


.png)


.jpg)
.jpg)


.jpeg)


.jpg)


.png)
.png)
.png)
.png)
.png)
.png)


.png)

.jpg)
